Docker containers have made website deployment fast and reliable. They’ve also become quite popular in deploying WordPress applications, largely due to their robustness and performance benefits. More and more WordPress-based businesses are switching to container technology to optimize their workflows. We realized the growing demand and benefits of Docker containers way before anybody else, so we decided to offer it as a service to WordPress and WooCommerce businesses.
A typical WordPress setup requires configuring multiple software components and an environment that is compatible to run these dependencies. Shipping these WordPress sites also requires exactly the similar environment as it was developed. Otherwise, the site might not run or throw errors. This is a common issue for agencies and freelance developers that build clients’ sites on local machines and migrate them over to clients’ servers.
Similarly, managing and updating each component is also challenging and adds unnecessary complexities for developers. Docker is a platform that provides tools for packaging and shipping these software components inside containers. These Docker containers are easy and safe to deploy which makes them very effective for faster software delivery and CI/CD.
Let’s learn more about the benefits of Docker containers with respect to WordPress!
What’s a Container-based Environment?
A container is a step further in virtualization. It is an isolated environment that contains all the necessary dependencies for running the application. Each container is a virtual operating system that runs your application, irrespective of its physical environment. It contains just the required binary code and libraries to keep it operational and lightweight.
In simpler words, a container is a virtual machine that has everything to run your application, but since it’s a lightweight isolated environment, it can be deployed to any physical environment without worrying about compatibility issues. It is a smart way to segregate your application from its physical environment i.e. a server.
Why WordPress Docker Is A Better Choice?
Docker is a collection of tools to develop, package, and ship software quickly and conveniently. Docker leverages container technology for creating standalone virtual environments that contain everything to run your application and are manageable through simple commands. Docker also allows the usage of read-only templates known as “Docker images” for defining the recipe of a container. This image contains the instructions for how to create a container and what dependencies to add for a required application to work.
In short, Docker allows us to create and manage containers for scalable applications and speed up software delivery. They also optimize resource consumption on a server which means more code can run on each server which saves both energy and money.
WordPress Docker hosting deploys various services of your WordPress site on high-performing and resource-efficient containers. These containers enable your website to consume maximum allocated resources and create new copies to cope with the growing traffic. This agility makes WordPress Docker hosting ideal for any growing eCommerce, LMS, publishing, or membership site.
The Benefits of Installing WordPress On Docker Containers
Docker container is a robust and flexible way of managing and packaging an application inside a virtual environment. Let’s look at the benefits you can get from deploying a WordPress site using Docker containers.
Portability
Your WordPress application inside a Docker container becomes portable once tested, it can be deployed to another environment without any compatibility issues. These containers preserve the working version of your site and ensure that your site works as long as the hosting server has Docker installed.
Isolation
A docker container is a standalone system that contains all the dependencies with the versions needed to run your WordPress website. Deploying another Docker container with different versions of dependencies has no impact on the first one. This level of isolation also boosts performance and security.
Scalability
The biggest benefit of using Docker containers is scalability. Additional containers can be replicated quickly to serve large volumes of traffic. It is one of the reasons why at Convesio we use Docker containers to host our customers’ sites. This allows us to create as many containers as needed instantaneously – both within the server and across the cluster of servers and terminate them when the requirement is fulfilled.
This kind of auto scaling is extremely important for mission-critical sites, large eCommerce businesses, and online Learning Management Systems, as it allows them to grow without worrying about server crashes, degraded performance, and losing money on maintaining large servers.
How to Install WordPress Using Docker Containers
Let’s begin the fun part: installing WordPress on a Docker container. The best part? The whole process is very straightforward and easy to follow. Here we go!
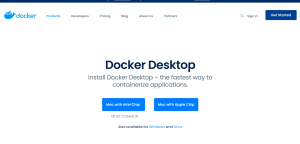
Step 1: Get the Docker Desktop Client
The first step is to get all the dependencies installed on your local machine. This includes the Docker desktop client and Docker Compose for easy container management using YAML files.
The Docker desktop client is available for all three operating systems: macOS, Windows, and Linux.
For Windows, you will have to enable Hyper-V to enable virtualization in your Windows machine. After installing and setting up the Docker desktop client, open the terminal or command line in Windows and run the following command to check if Docker compose is installed and ready to use.
docker-compose –version
Step 2: Setting up the YAML file
In this step, create a new directory for your new WordPress site. To do this, simply run the following command inside your preferred location:
mkdir ~/wordpress/
Then cd into the new folder cd ~/wordpress/
Inside this new directory, create a new YAML file. Name the file as docker-compose.yml and open it inside any text editor. Fill the file with the following information:
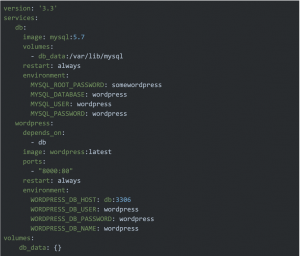
Replace MySQL and WordPress credentials with your own and save the file. You might be wondering: where are we going to download the zipped WordPress folder? And how will a YAML file bring both MySQL and WordPress files? We have already discussed the answer to the above questions, but I will go through it one more time. The answer is Docker images.
If you look at the YAML file closely, you will find that for both MySQL and WordPress, the image keyword is defined which tells the Docker engine to fetch these images from Docker Hub – image library and add them to the container.
Step 3: Build and Run the Project in the Browser
Now go back to the terminal and inside the newly created wordpress directory, run the following command.
docker-compose up -d
This command will build and run the project. Since it is currently running on a local server, you will have to navigate to the right URL in your browser in order to access the WordPress installation wizard. In the above YAML file, the set port was localhost:8000, therefore, use the URL http://localhost:8000 to access the installation.