Connect ConvesioPay to your Shopify store using the ConvesioPay Shopify app. The app works on any Shopify plan — not just Shopify Plus — and replaces Shopify’s native checkout with a hosted ConvesioPay checkout that supports credit cards, Apple Pay, Google Pay, and Affirm.
Before you start
You will need:
- An active ConvesioPay account (merchant account verified)
- A Shopify store with admin access
- Your ConvesioPay email address and Admin Client Key — available in your ConvesioPay dashboard under Settings → Developer
Step 1: Install the ConvesioPay app in Shopify
The ConvesioPay Shopify app is a private app — it is not listed in the public Shopify App Store. To get started, contact ConvesioPay support and request your private installation link. Once you have the link, open it in your browser while logged into your Shopify admin and follow the prompts to install. The app will appear under Apps → ConvesioPay in your Shopify admin sidebar once installed.
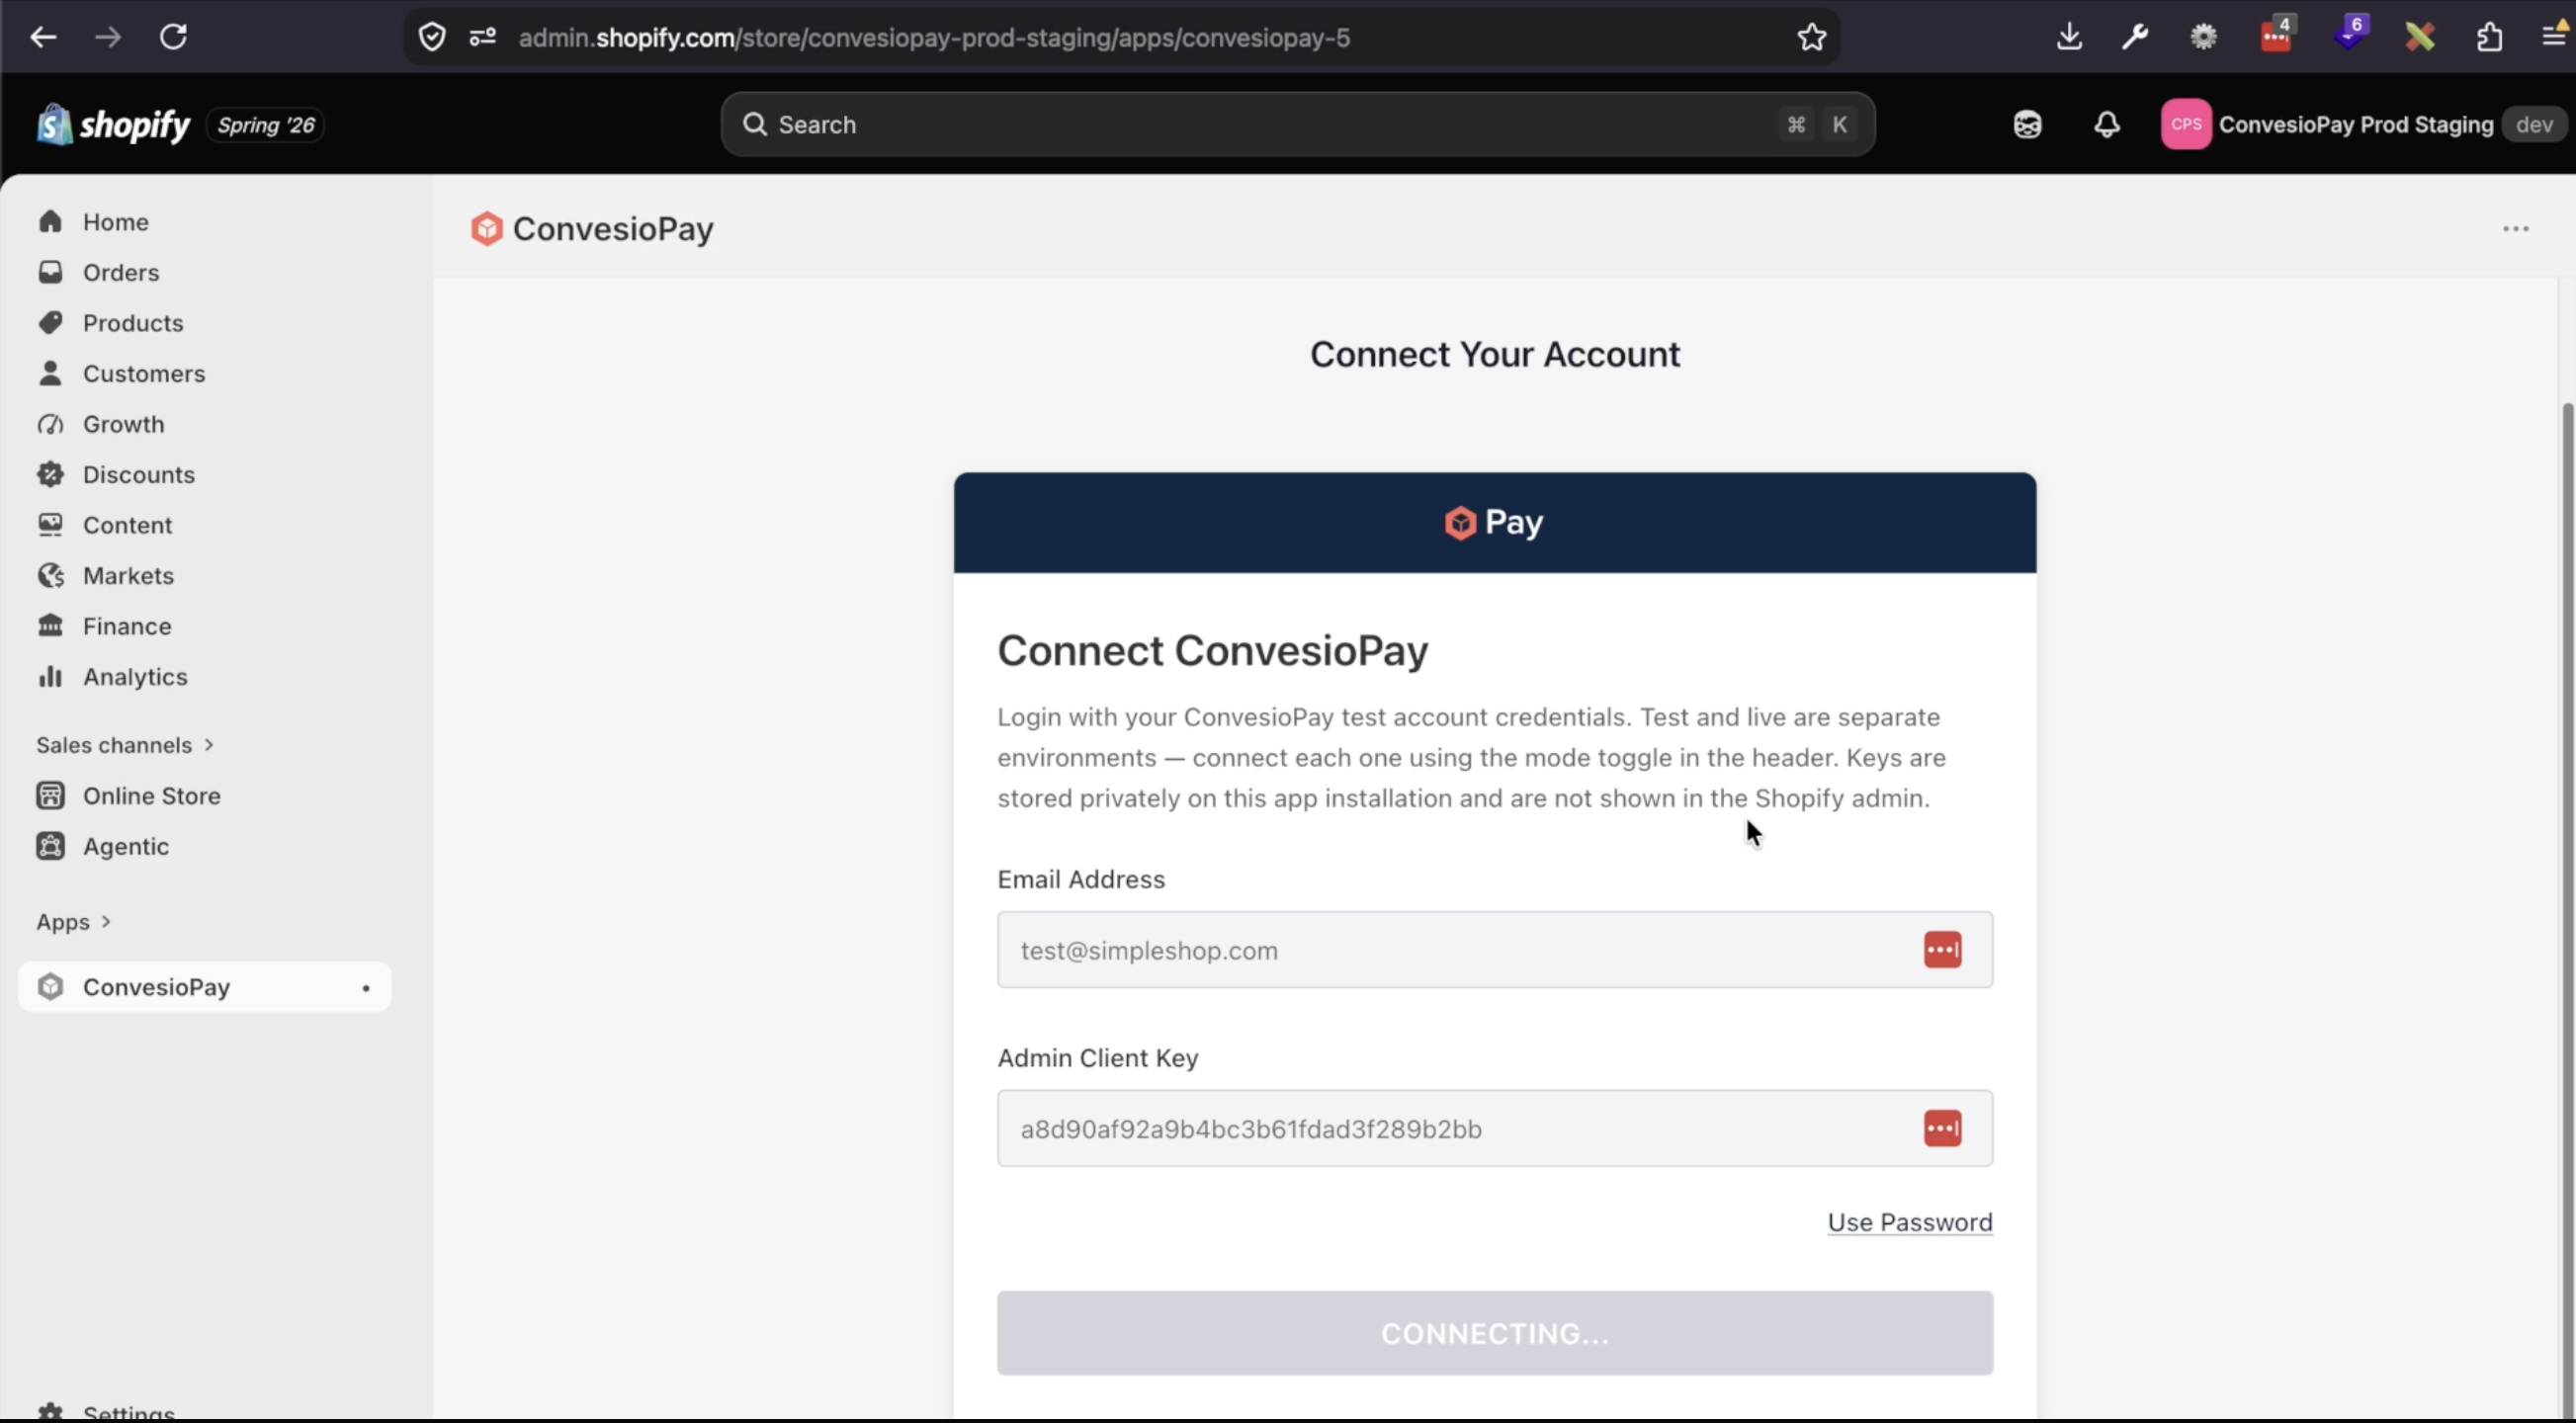
Step 2: Connect your ConvesioPay account
- In your Shopify admin, open Apps → ConvesioPay.
- On the Connect Your Account screen, enter:
- Email Address — your ConvesioPay account email
- Admin Client Key — from ConvesioPay dashboard → Settings → Developer
- Click Connect Account.
Note: Your credentials are stored privately within the Shopify app installation and are not visible in the Shopify admin. ConvesioPay test and live environments are separate — you can connect each one independently using the mode toggle in the app header.
Step 3: Confirm the connection
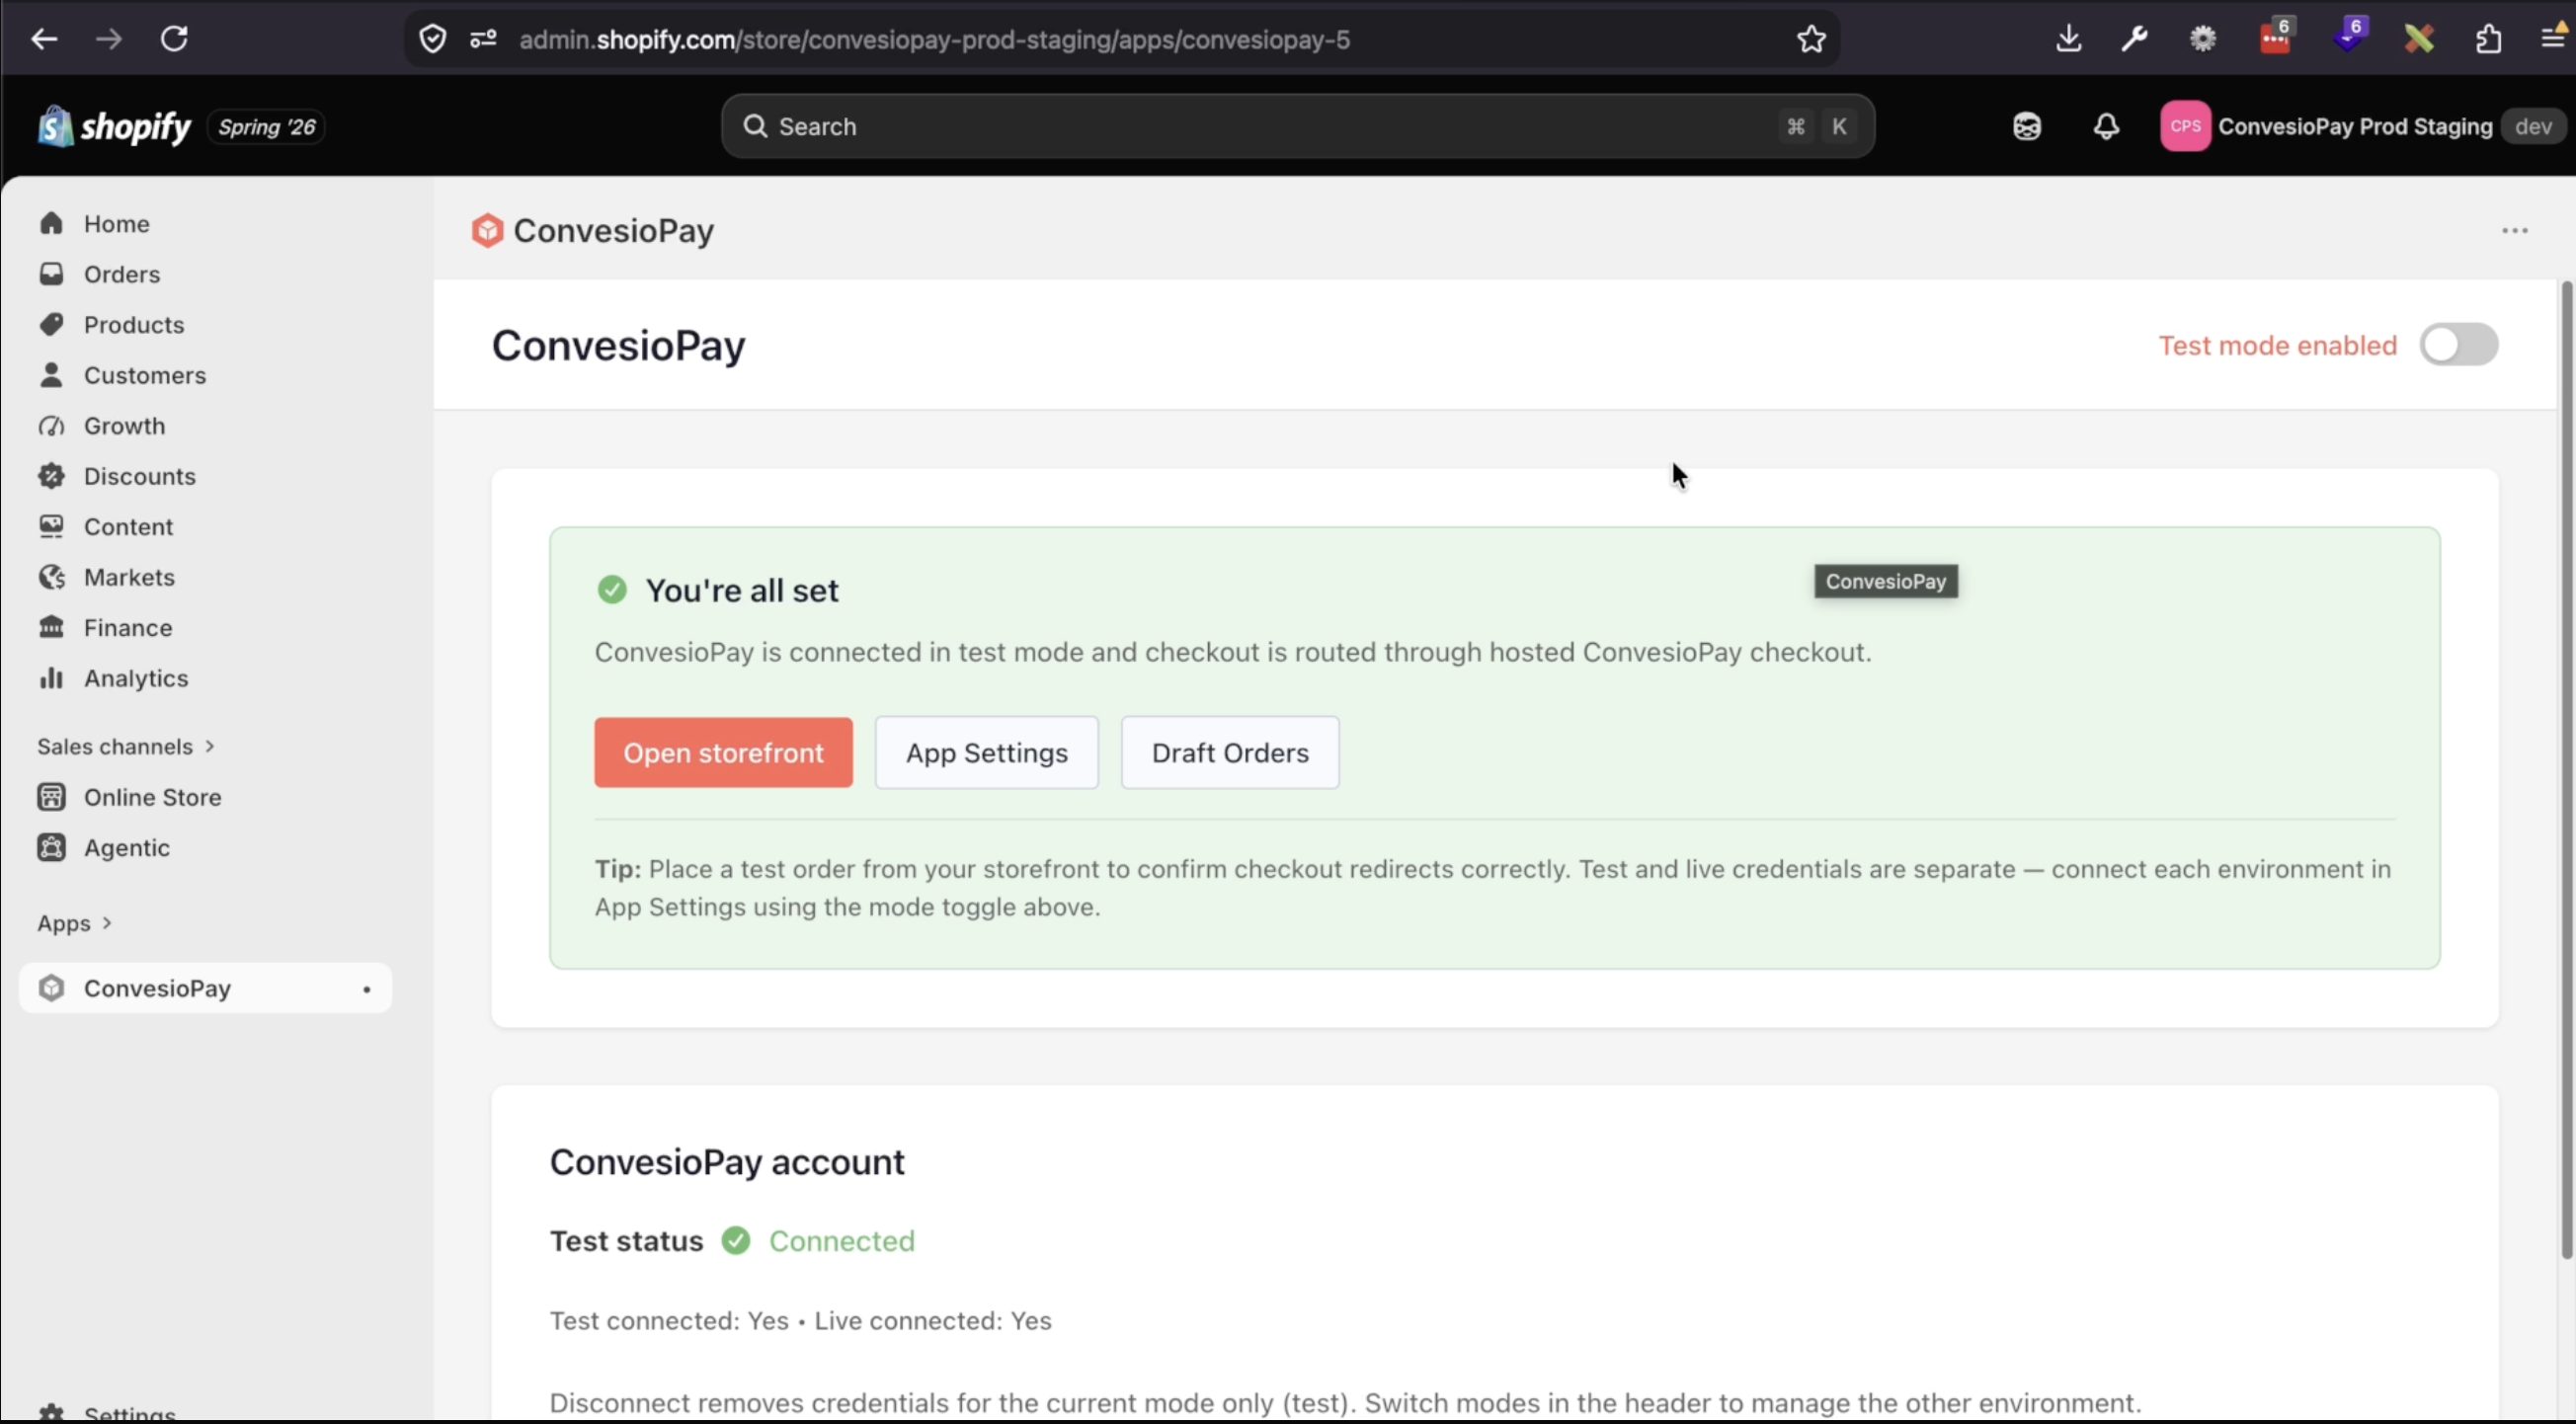
After connecting, the app displays a confirmation screen:
- “You’re all set” — ConvesioPay is connected and your store’s checkout is now routed through the hosted ConvesioPay checkout.
- The Test status row shows Connected under your ConvesioPay account details.
- A tip reminds you to place a test order from your storefront to confirm checkout redirects correctly.
From this screen you can:
- Open storefront — go directly to your live store
- App Settings — configure payment options and preferences
- Draft Orders — create manual orders
Step 4: Place a test order
- From the confirmation screen, click Open storefront.
- Browse your store, add a product to your cart, and proceed to checkout.
- You’ll be redirected to the ConvesioPay hosted checkout at
shopify-checkout.convesiopay.com.
What the checkout looks like
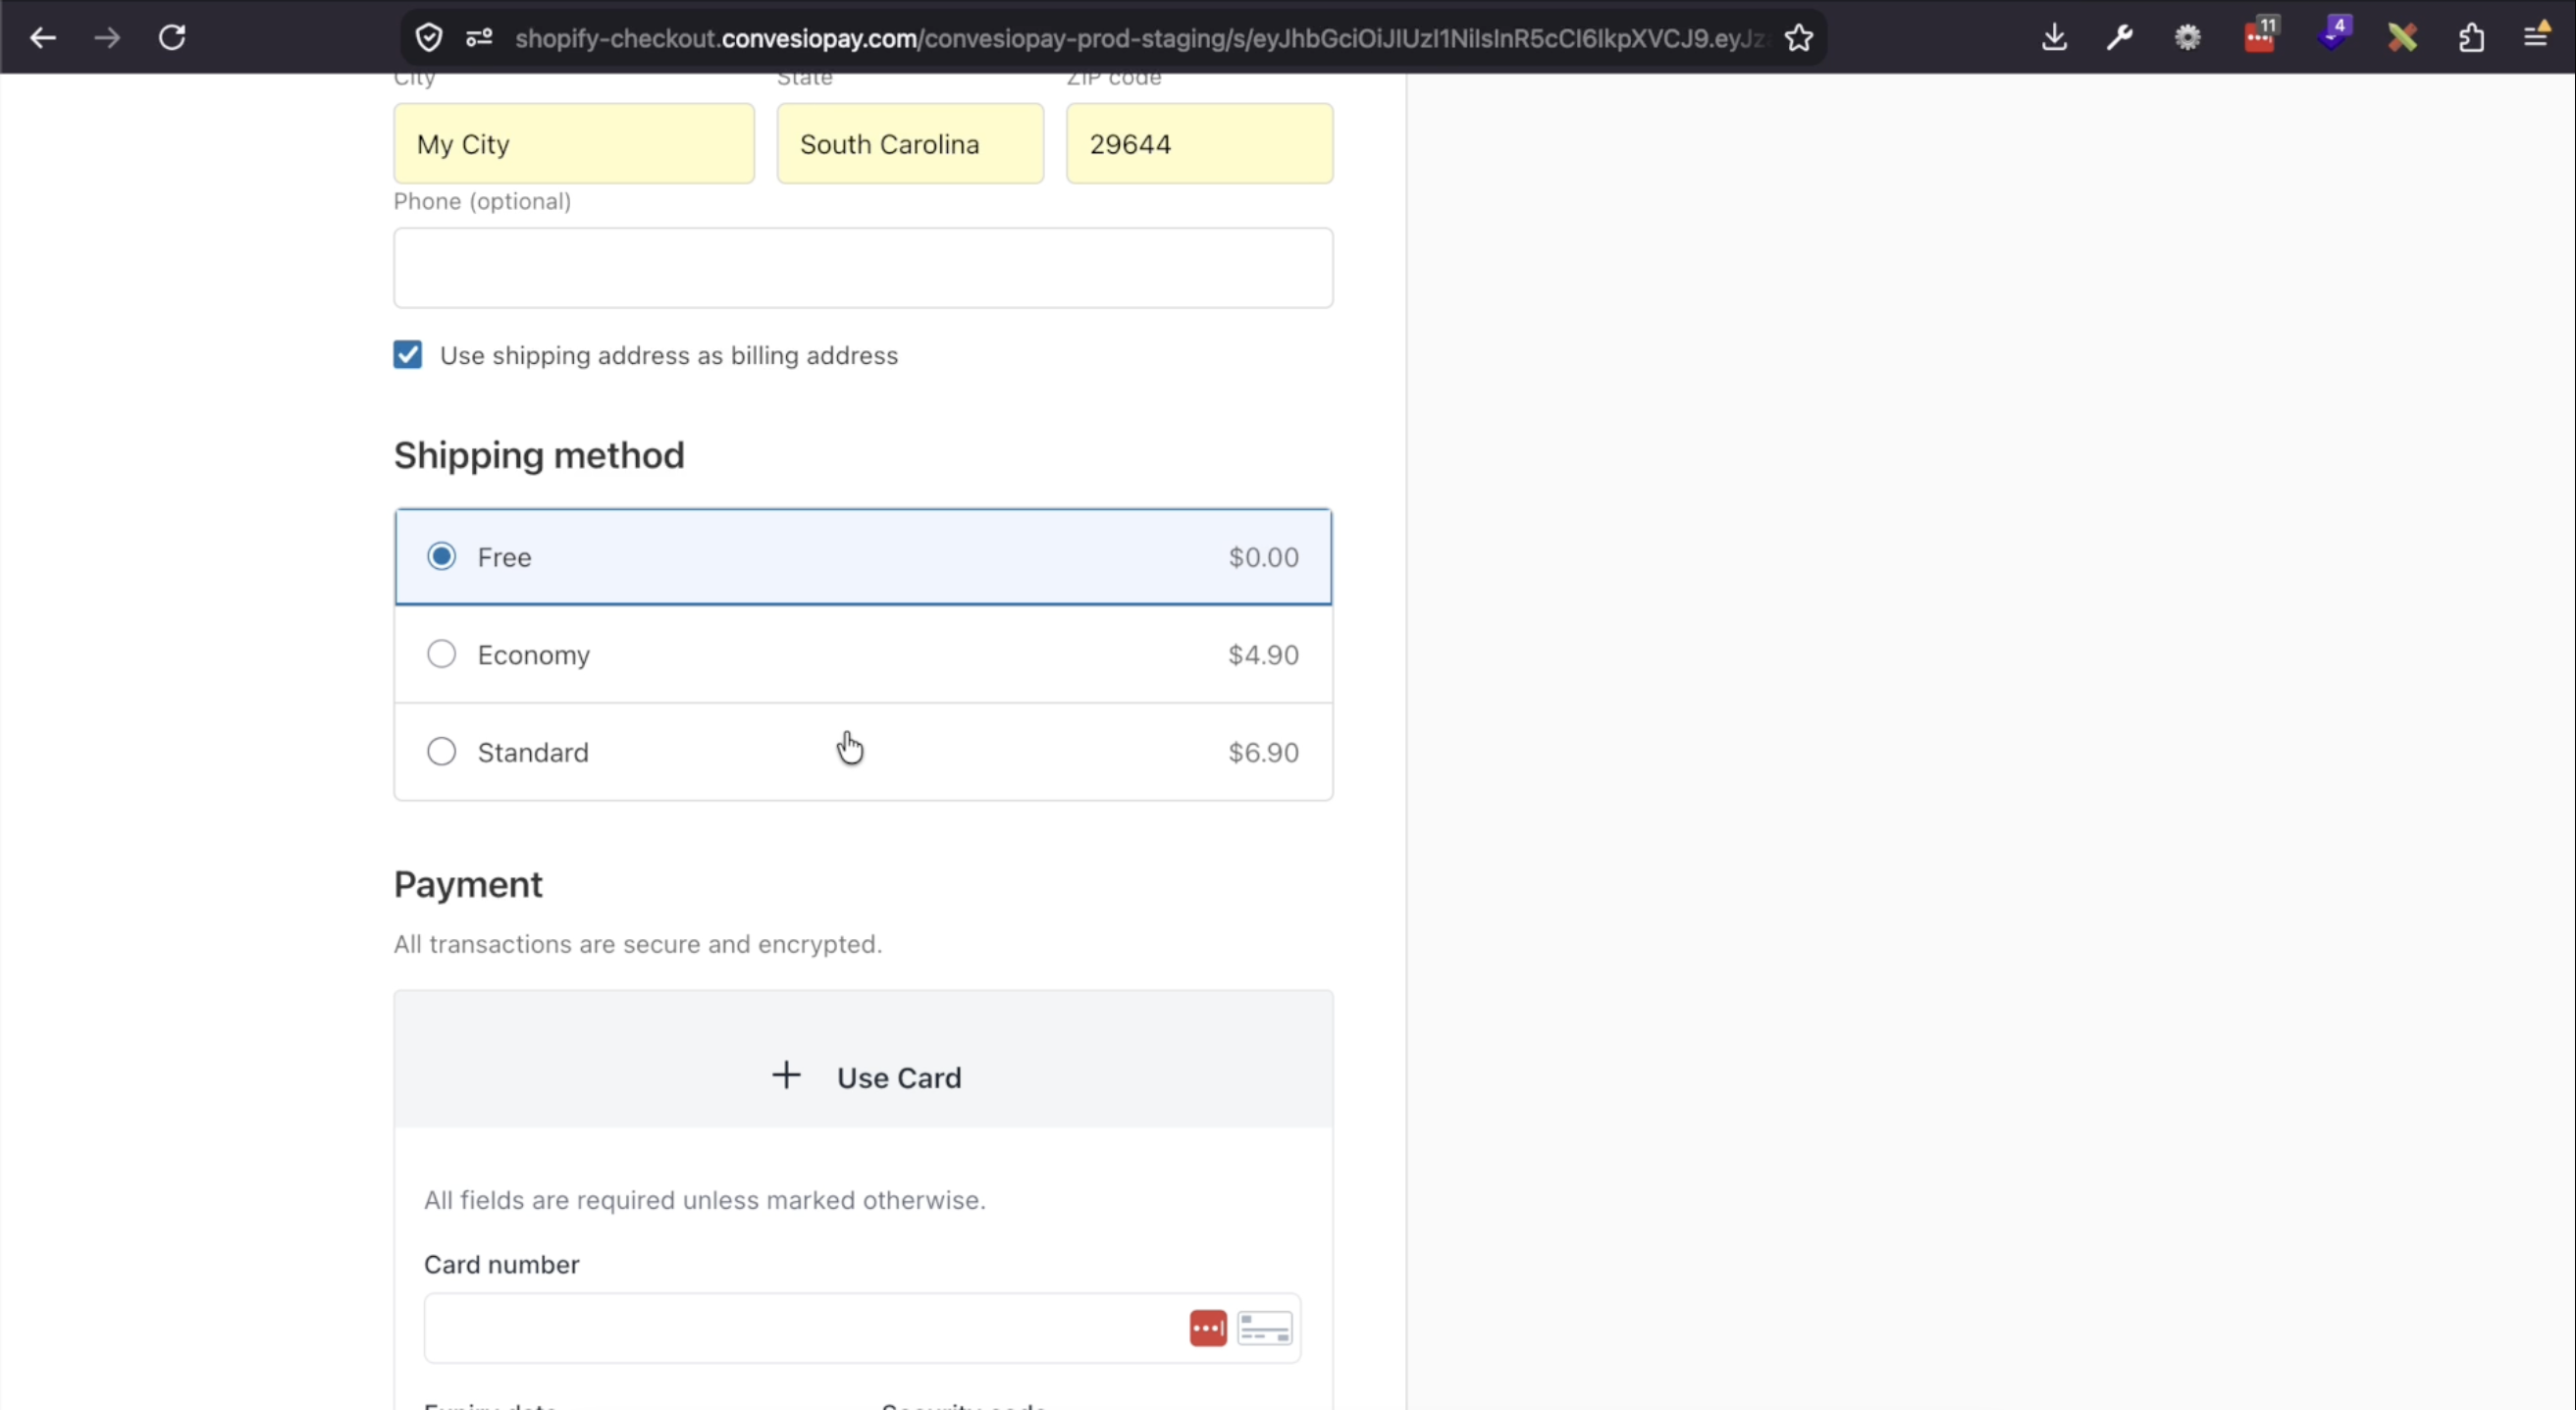
The ConvesioPay checkout is a full hosted checkout page — not Shopify’s native checkout. It includes:
- Shipping address fields
- Shipping methods — dynamically loaded from your Shopify shipping settings, so customers see the same options they’d see in Shopify’s native checkout
- A cart summary panel
- Payment section with card entry, Apple Pay, and Google Pay
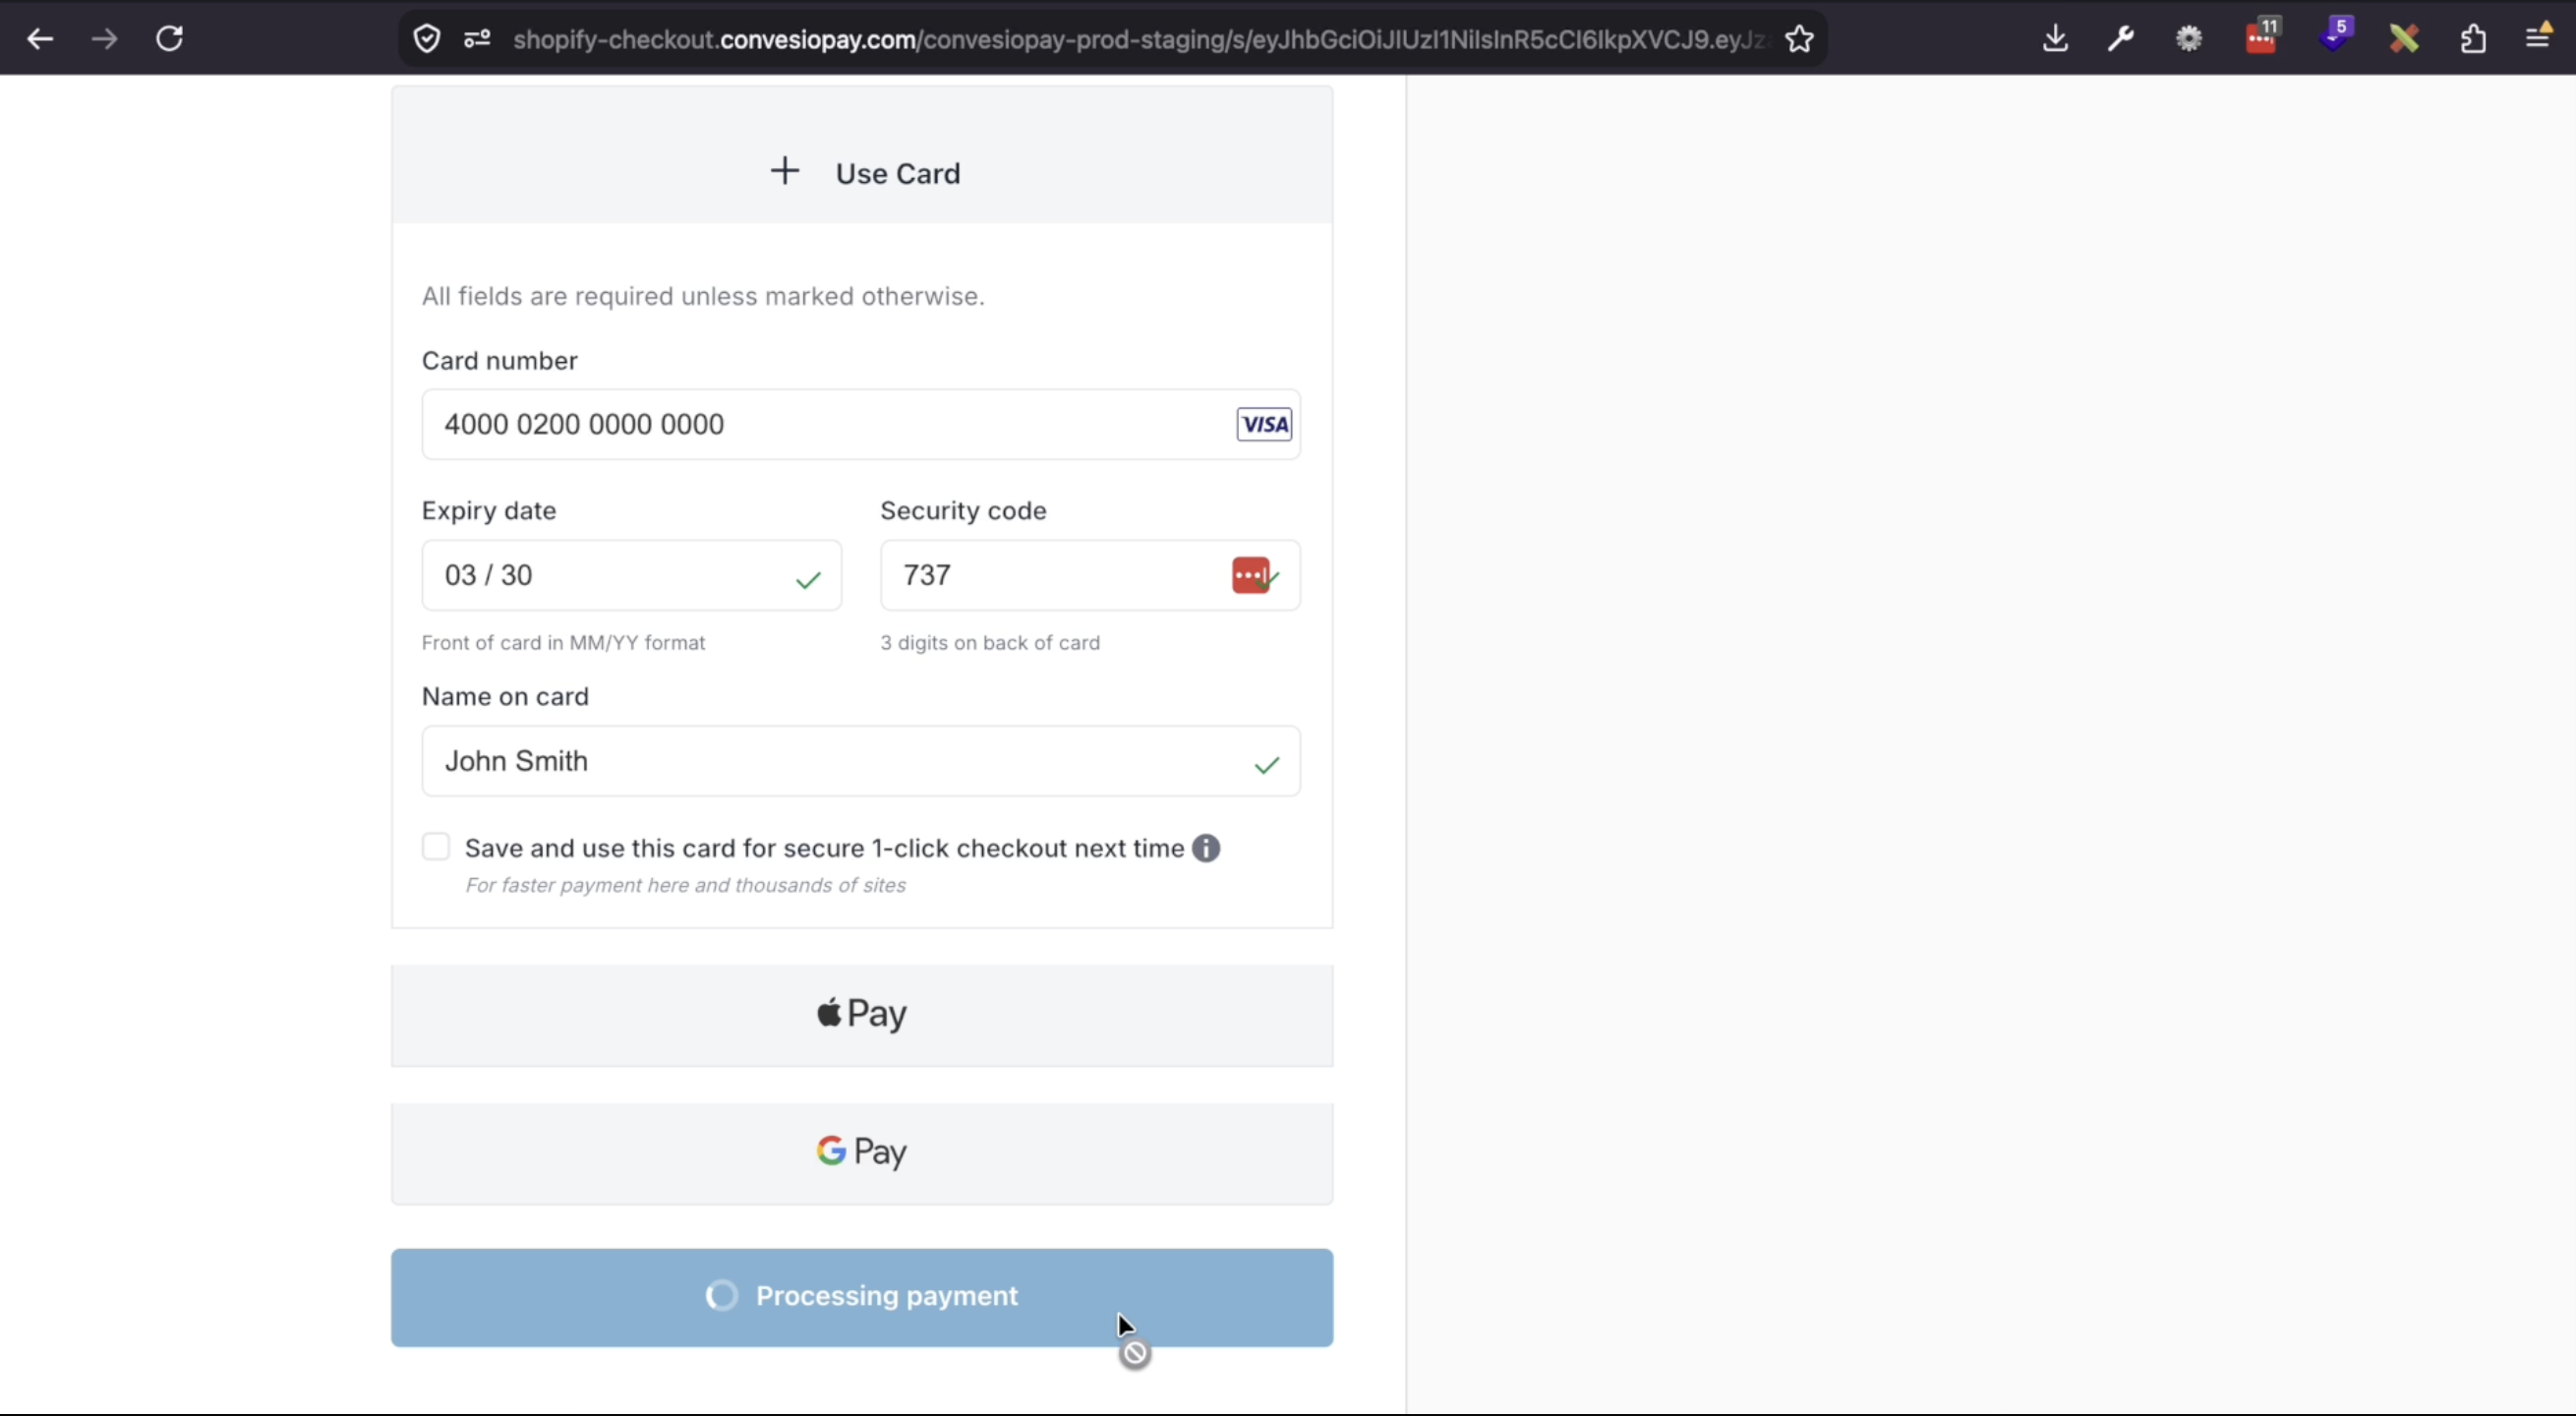
Use a test card to complete the payment:
- Card number:
4000 0200 0000 0000 - Expiry:
03/30 - CVV:
737
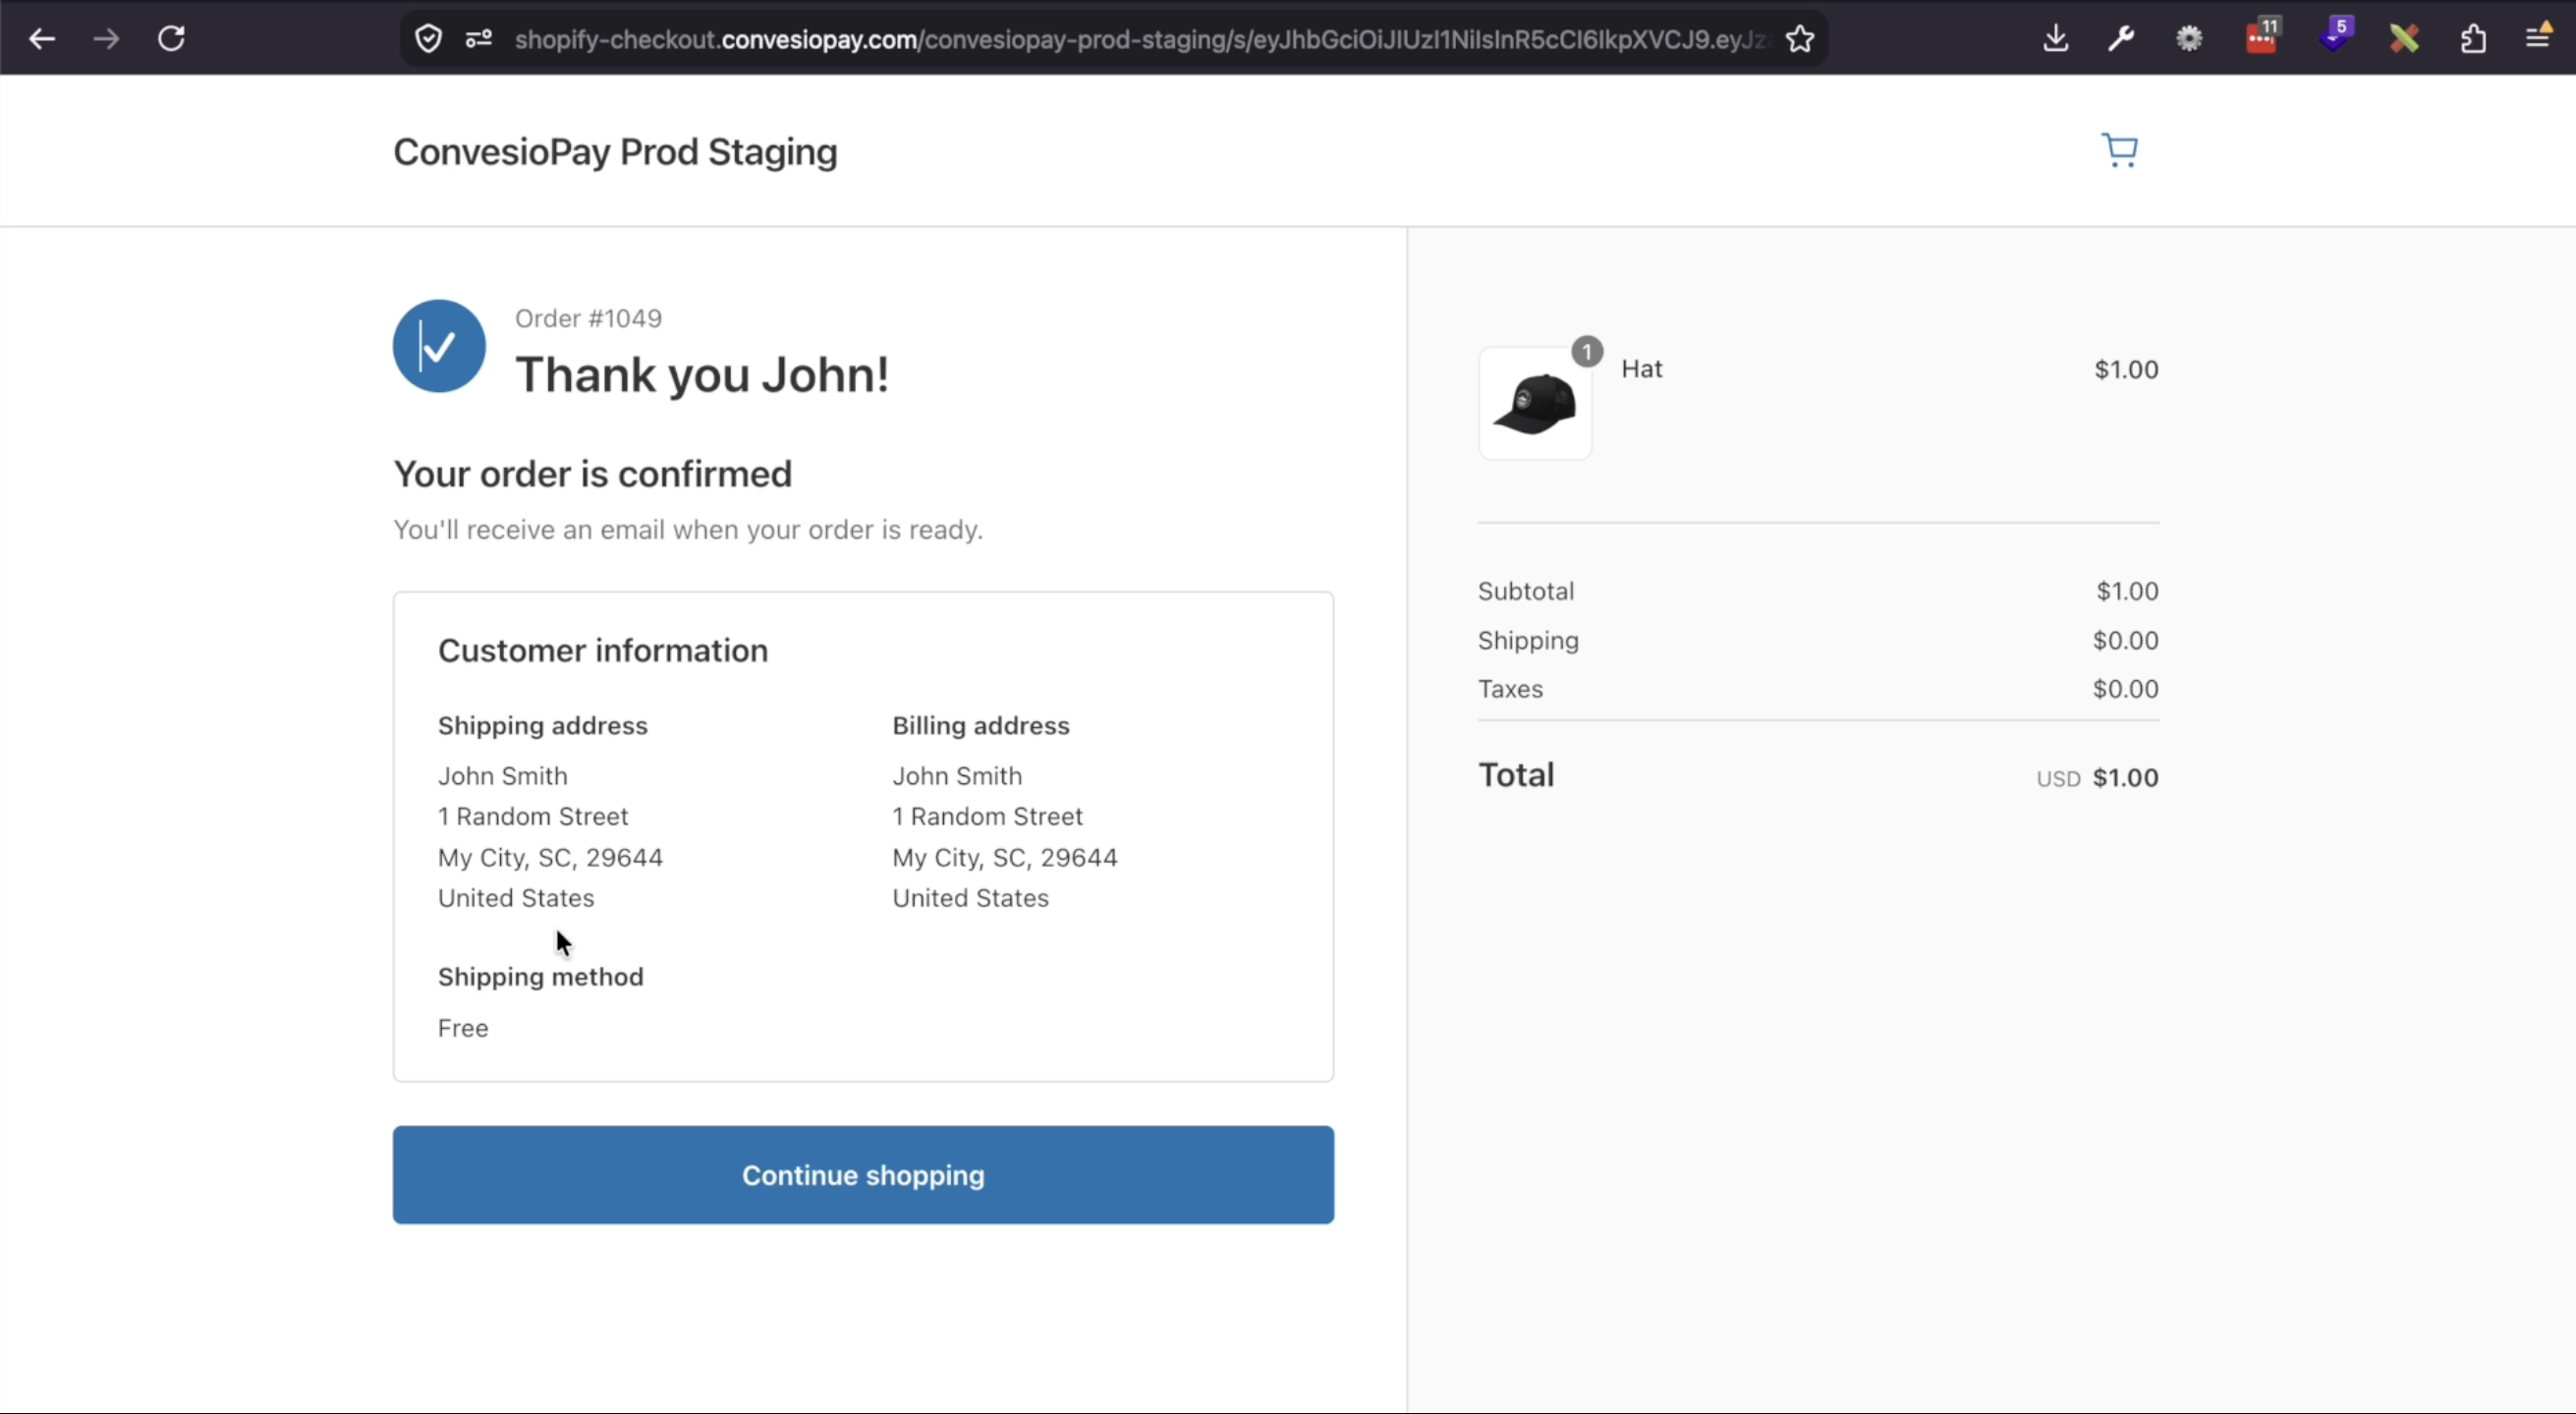
After the payment processes, your customer sees an order confirmation page with the order number, shipping details, and a “Continue shopping” button that returns them to your store.
Step 5: Verify the order in Shopify
- In your Shopify admin, go to Orders.
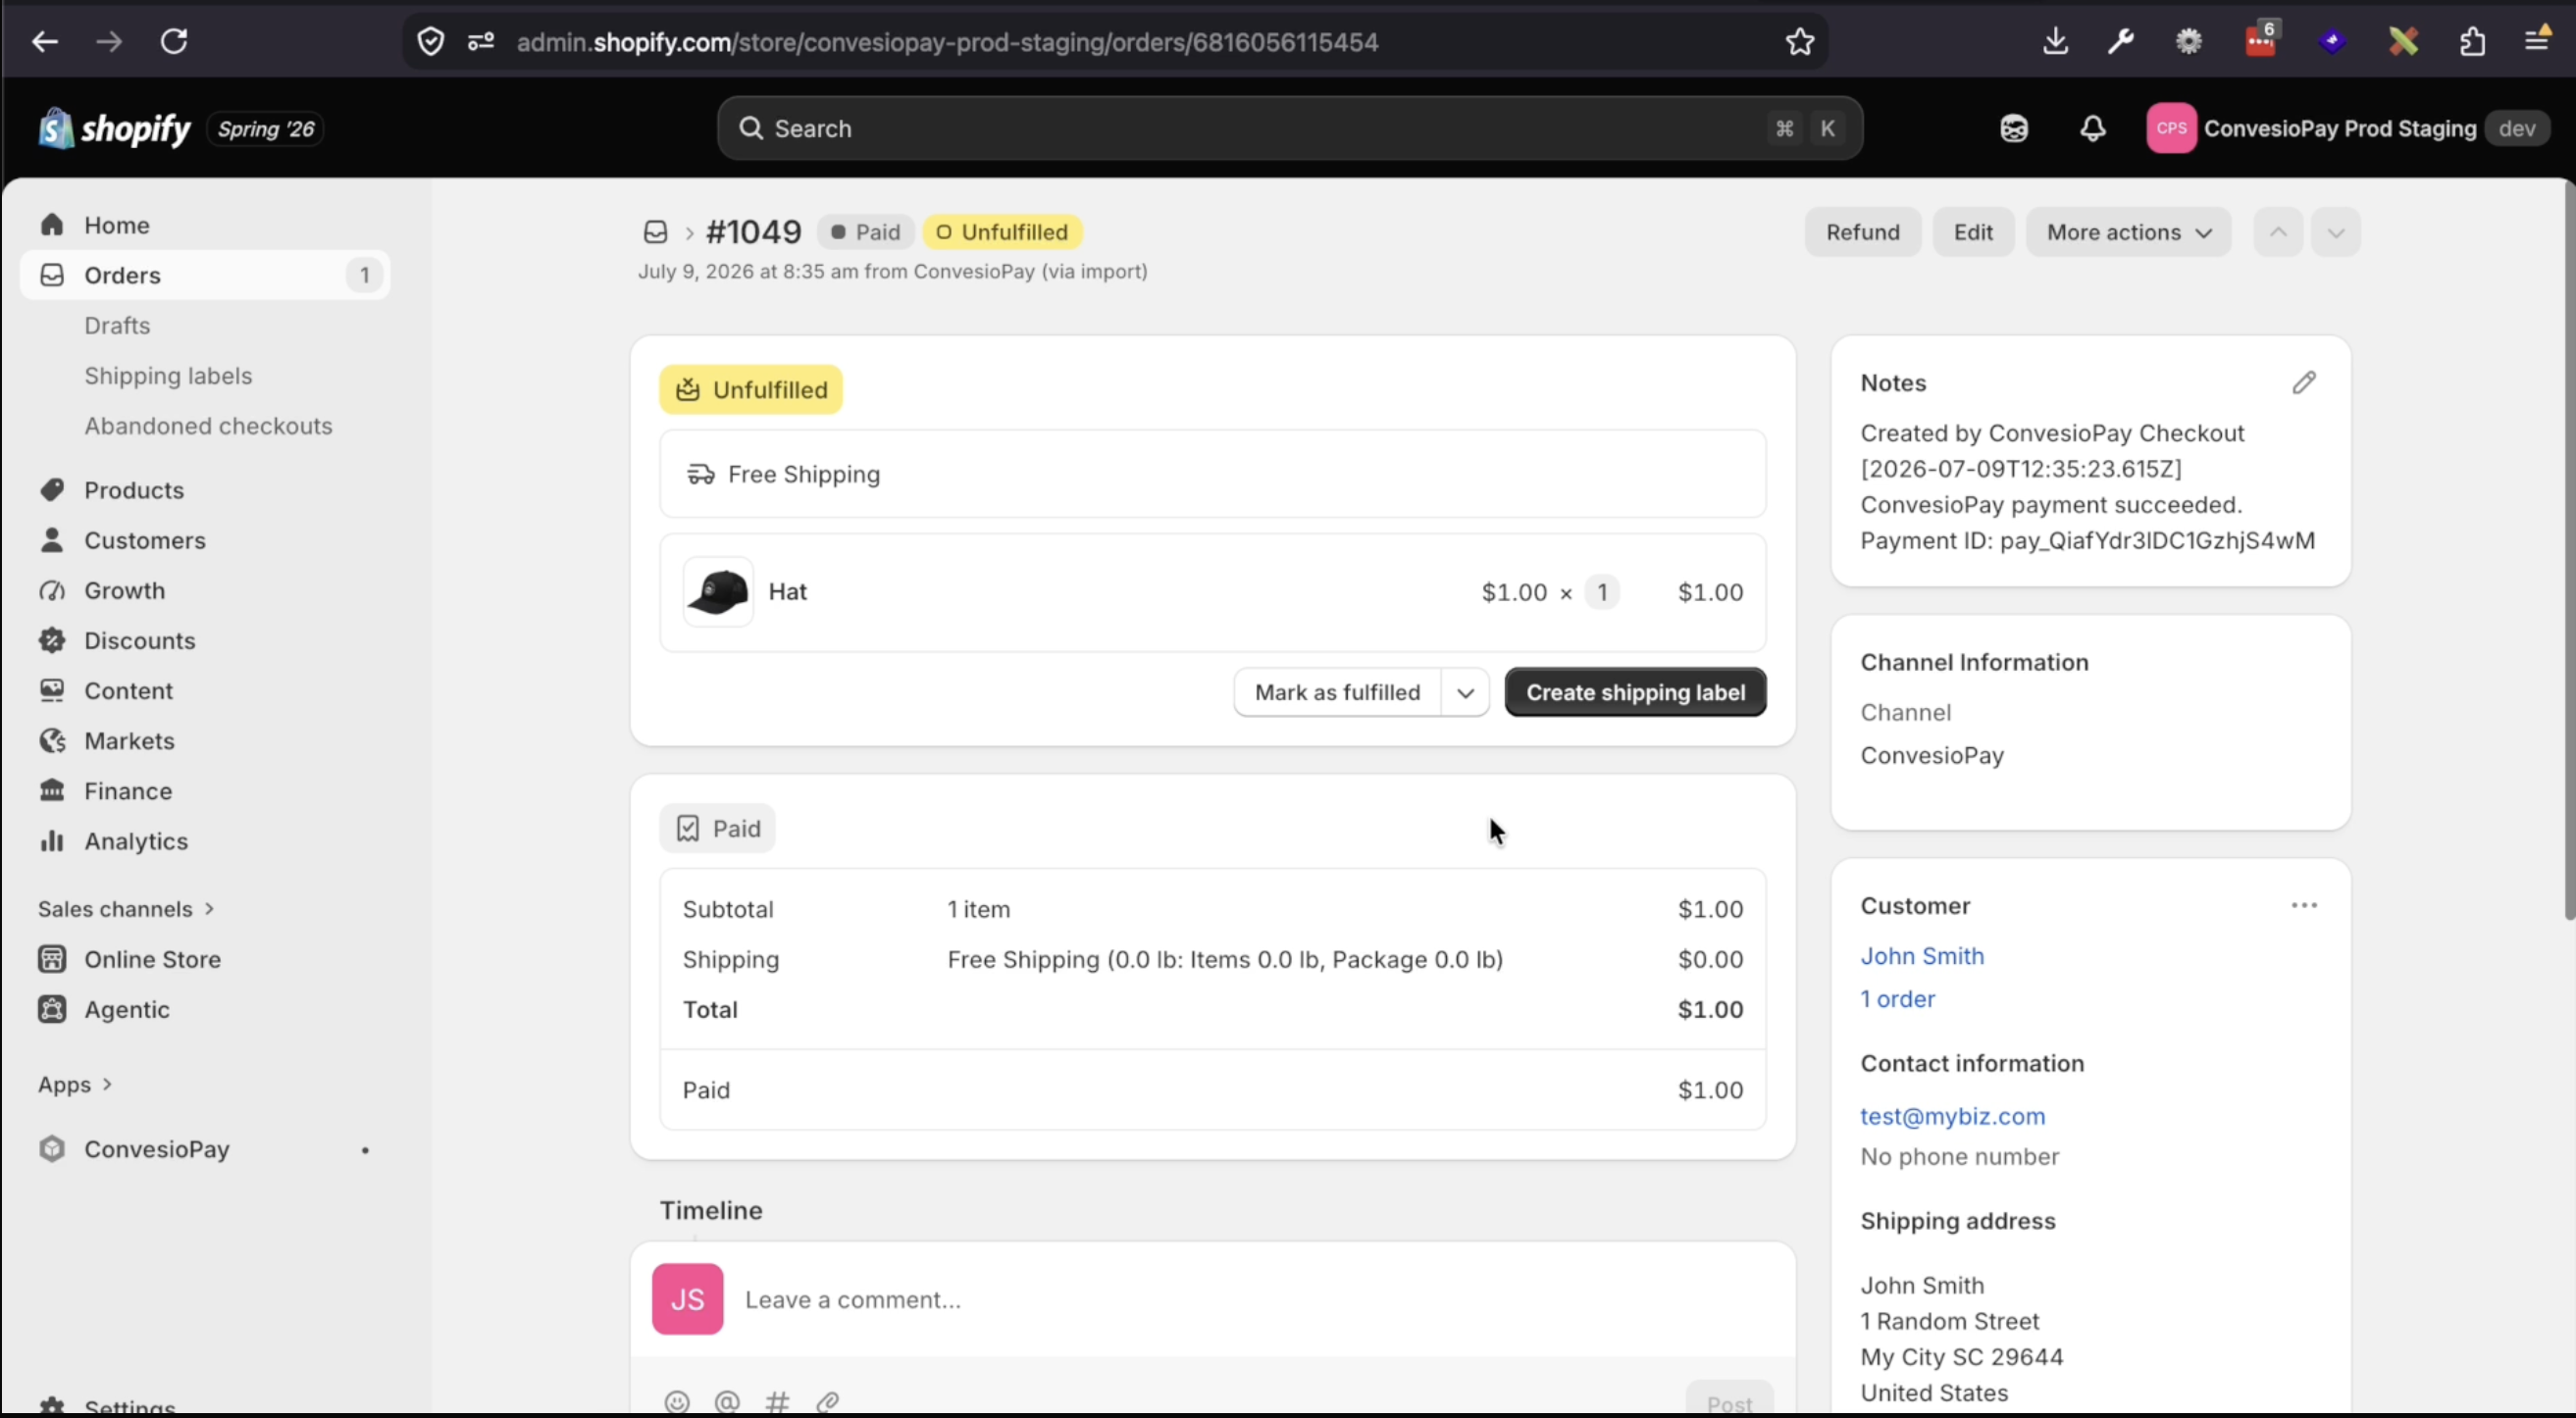
- Find the order — it should be marked Paid (sometimes appearing almost immediately; may show as Pending if you have manual capture enabled or if a 3DS challenge is triggered).
- Open the order and check the Notes panel on the right — you’ll see:
- “ConvesioPay payment succeeded.”
- The Payment ID (e.g.,
pay_QiafYdr3lDC1GzhjS4wM) — use this to look up the transaction in your ConvesioPay dashboard
- The Channel column will show ConvesioPay.
Step 6: Verify the payment in ConvesioPay
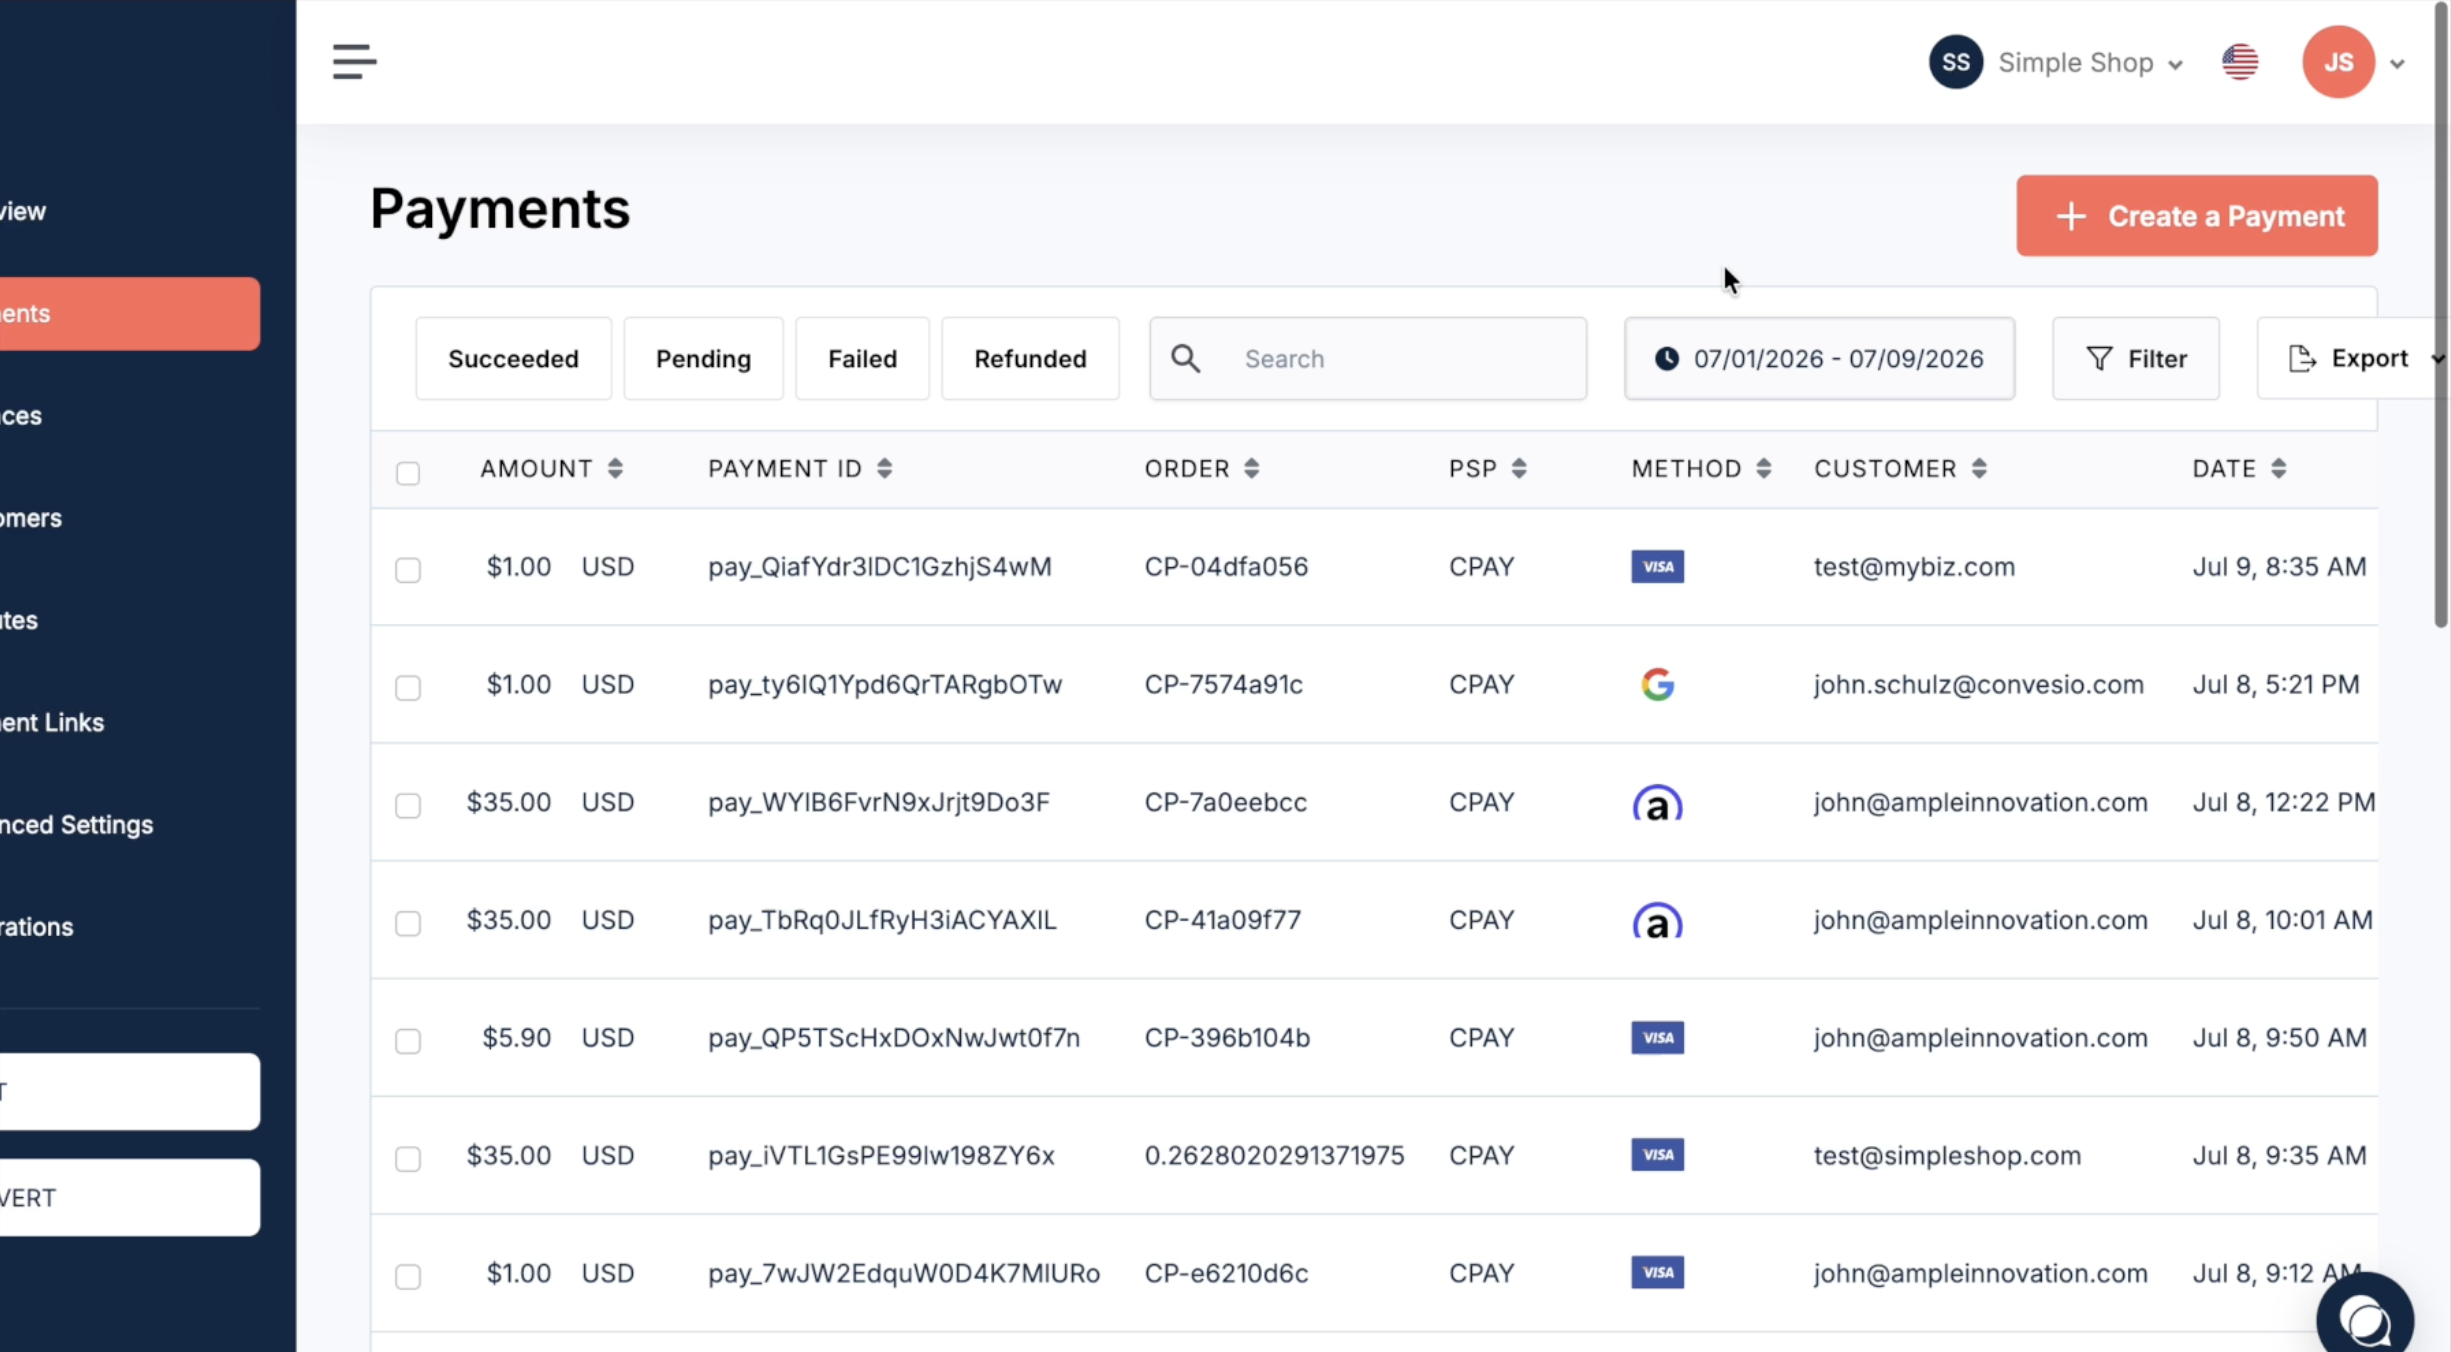
- Log in to your ConvesioPay dashboard and go to Payments.
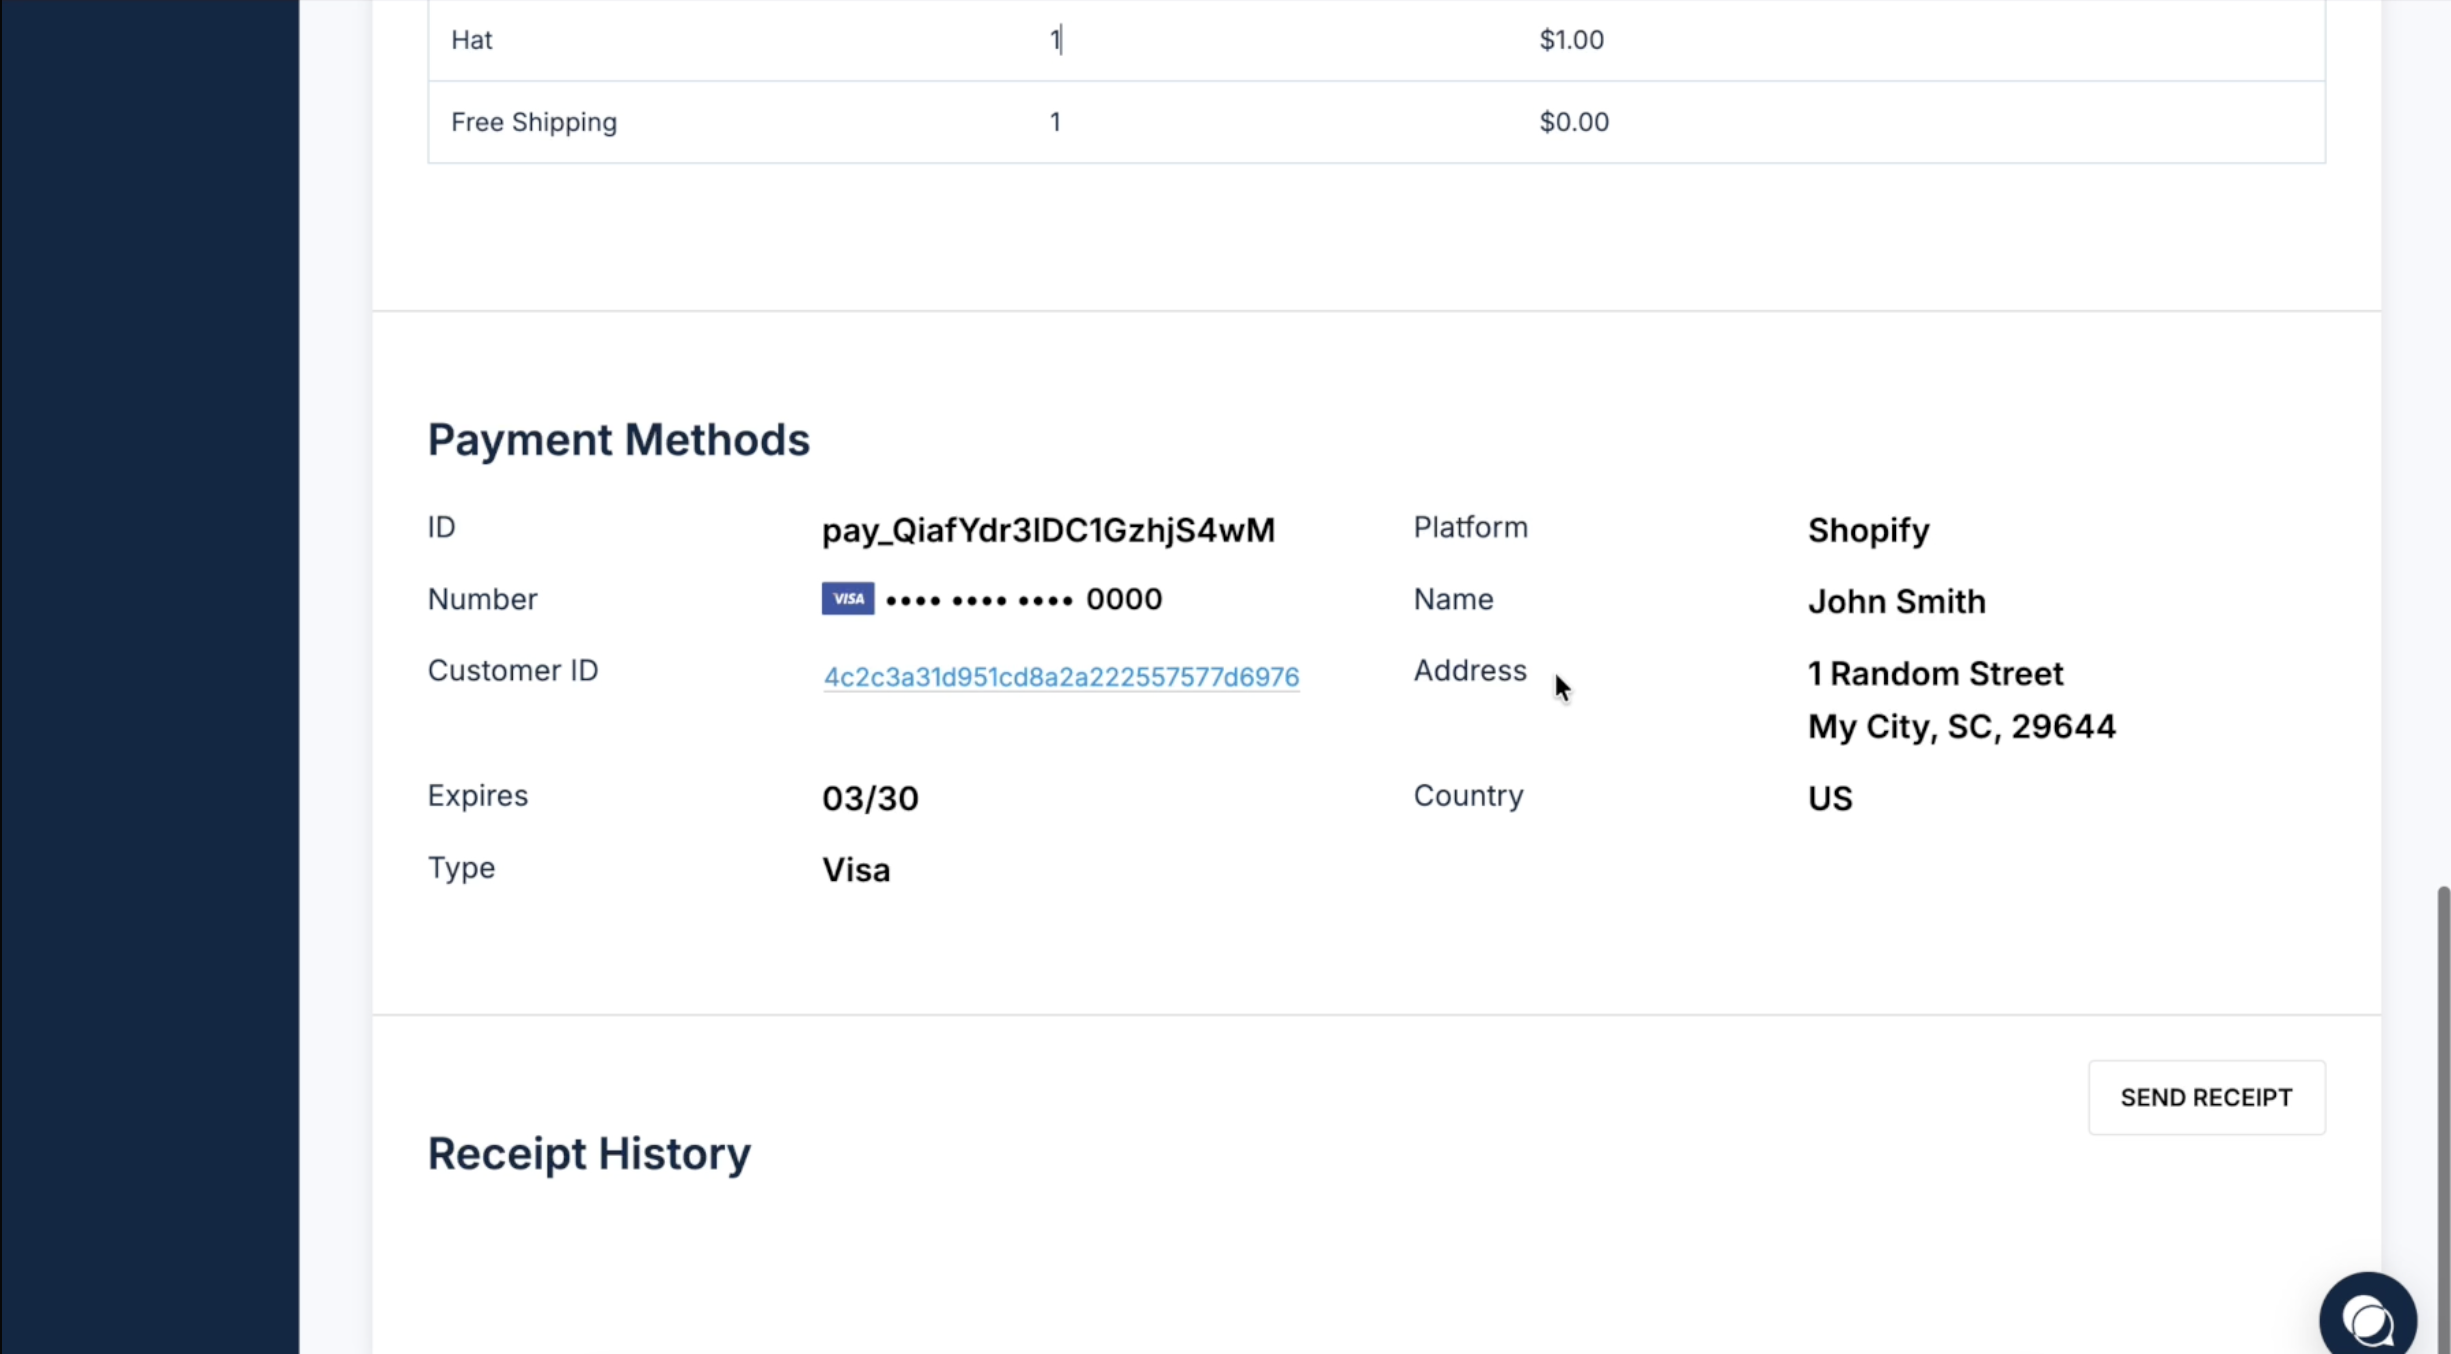
- The transaction will appear in the list with Platform: Shopify in the payment detail.
- Click the payment to view full details: capture status, product information, shipping method chosen, and card details.
Switching between test and live mode
The ConvesioPay app header shows a Test mode toggle. Test and live environments use separate credentials:
- Test mode — use your ConvesioPay test account credentials for placing test transactions
- Live mode — use your ConvesioPay live account credentials; real payments will be processed
To switch modes, click the toggle in the app header and reconnect with the credentials for that environment.
Refunds
You can refund a ConvesioPay/Shopify order from three places:
- Shopify admin — open the order → click Refund → choose full or partial refund
- ConvesioPay dashboard — go to Payments → find the transaction → issue a refund
- ConvesioPay API — via the refunds endpoint
When a refund is issued, the Shopify order status updates to Refunded and the order timeline is updated automatically.
Supported payment methods
The following payment methods are available at checkout when enabled on your ConvesioPay account:
- Credit and debit cards — Visa, Mastercard, Amex, Discover
- Apple Pay — available in Safari on Apple devices
- Google Pay — available in Chrome with a saved card
- Affirm — buy now, pay later; available at checkout when enabled on your ConvesioPay account
Troubleshooting
Checkout doesn’t redirect to the ConvesioPay checkout
- Confirm the ConvesioPay app is installed and your account is connected (check Apps → ConvesioPay → the status should show “You’re all set”)
- Try disconnecting and reconnecting your account
Order shows as Pending instead of Paid
- This is expected if you have manual capture enabled in ConvesioPay, or if a 3DS challenge was triggered. The order will update once the challenge is resolved or the payment is captured.
Payment ID not appearing in Shopify order notes
- Wait a few seconds and refresh — notes are written by the app after payment confirmation
- Contact support if the notes remain empty after the order is confirmed
Apple Pay or Google Pay not appearing at checkout
- Apple Pay requires Safari on an Apple device with a card saved in Wallet
- Google Pay requires Chrome with a card saved in Google Pay
- Confirm the payment method is enabled in your ConvesioPay account settings
How to disconnect the integration
- In Shopify admin, open Apps → ConvesioPay.
- Click Disconnect next to your connected account.
- Repeat for the other environment (test or live) if both were connected.
Your store will revert to Shopify’s native checkout once ConvesioPay is disconnected.